


I am so excited for today’s Blog Hop, it’s going to be Slimsational! The amazing Slimline Die Cut System from Picket Fence Studios made making these cards so easy that I was able to create 5 cards for you today!

We have a lot to get through so let’s get started!
All of today’s cards use the Slimline Die System from Picket Fence Studios with the slimline card bases measuring 8 1/2″ x 7 ” with the score line at 3 1/2″ and a bunch of copic coloured pieces that I had previously fussy cut and coloured ahead of time.
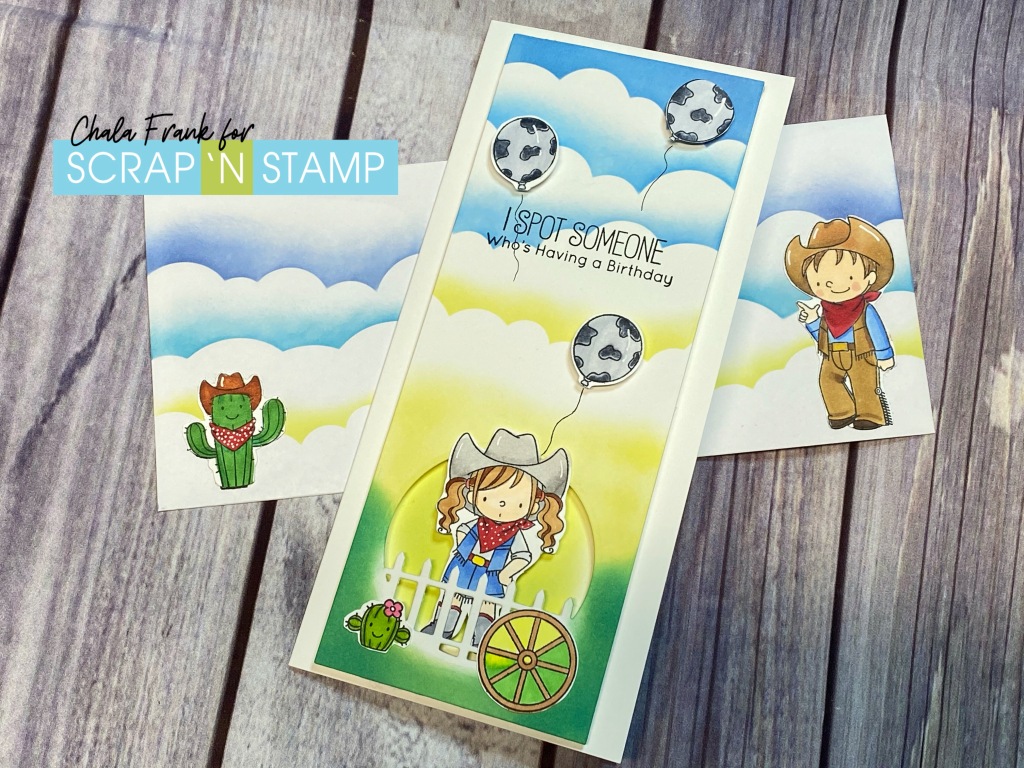
For my first two cards I will be using the Saddle Up & Celebrate stamp set from My Favorite Things. I used the smaller rectangle slimline die to create two panels that I will be ink blending one. The first panel I ink blended the Clouds Stencil from MFT with Distress Oxides in Salty Ocean, Faded Jeans and Squeezed Lemonade for a pop of brightness.
The second panel I was able to easily create a beautiful farm scene with the Picket Fence circle die, the square outside stitch die and the grassy circle die that came with the die cut system. I then ink blended the top portion in Broken China and the bottom in Lucky Clover. I did die cut a second picket fence piece and fussy cut it out and glued it on top to add dimension and to hide any of my ink blending that got on the fence portion.
I adhered the inked cloud panel onto the card base and then adhered the die cut scene onto of that with A LOT of foam squares so as not to get a saggy panel. I then adhered by characters onto the scene with some liquid adhesive. I recommend Gina K Connect glue or Hero Arts Precision glue as they are both strong adhesives.
For the sentiment I used the Lawn Fawn Bannertastic dies and heat embossed with Wow super fine white embossing powder.
I stepped up my card game by creating an ink blended cloud envelope to send the card in.


The second card uses the same techniques and stamp set but I oriented the card vertically and only used one of the die cut elements from the slimline die cutting system. Again, I stepped up my game with a matching envelope using the Xyron sticker maker and some of the pre-coloured elements to adhere to the envelope.

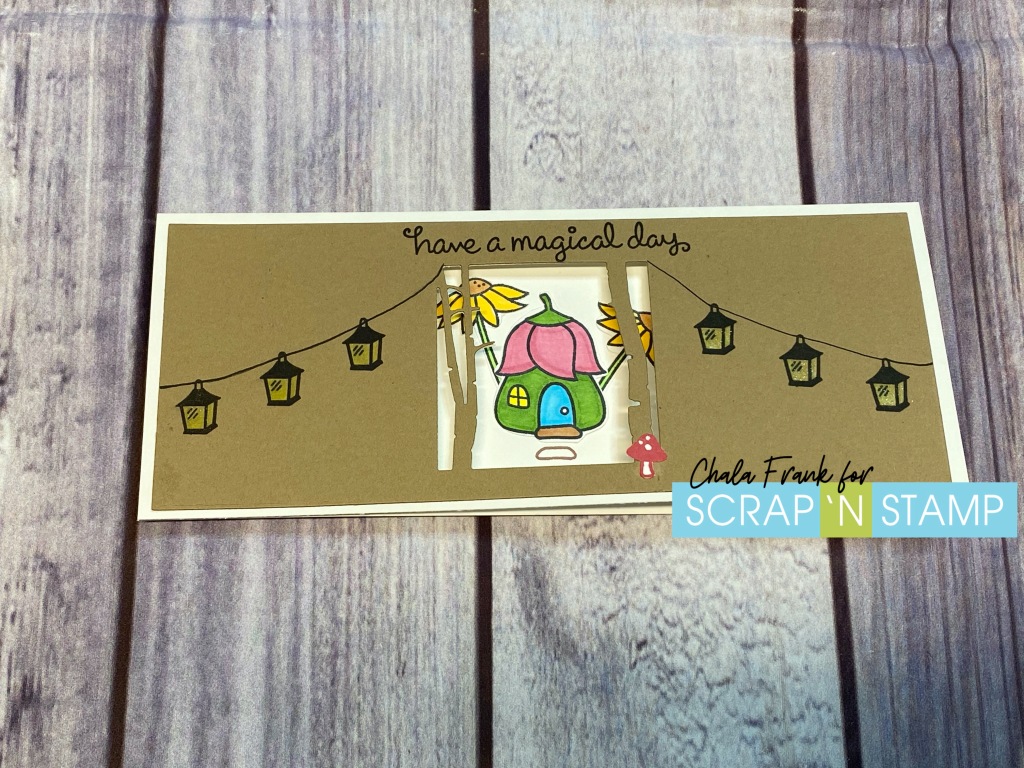
It was a magical moment for the third card as I used Lawn Fawn Fairy Friends and created a slimline window card with the birch tree square die to reveal the beautiful scene that I created for the inside of the card. I sometimes feel like I neglect the inside of my cards so I wanted not only to have my greeting, but fun images to go with it.
I used a yellow coloured pencil and some Clear Wink of Stella to add magic and sparkle to the lanterns as well as to the fairy wings.


My fourth card uses another favourite stamp set from MFT – Friends at First Sip. This time I only used the smaller rectangle die and some polka dot patterned paper. I then pulled out some of my own dies that I had on hand. I used an oval die and a stitched square die that I adhered onto the card base in the diamond position. For the sentiment inside I stamped the Picket Fence A Paper Hug stamp with Versafine Clair Nocturne Ink.


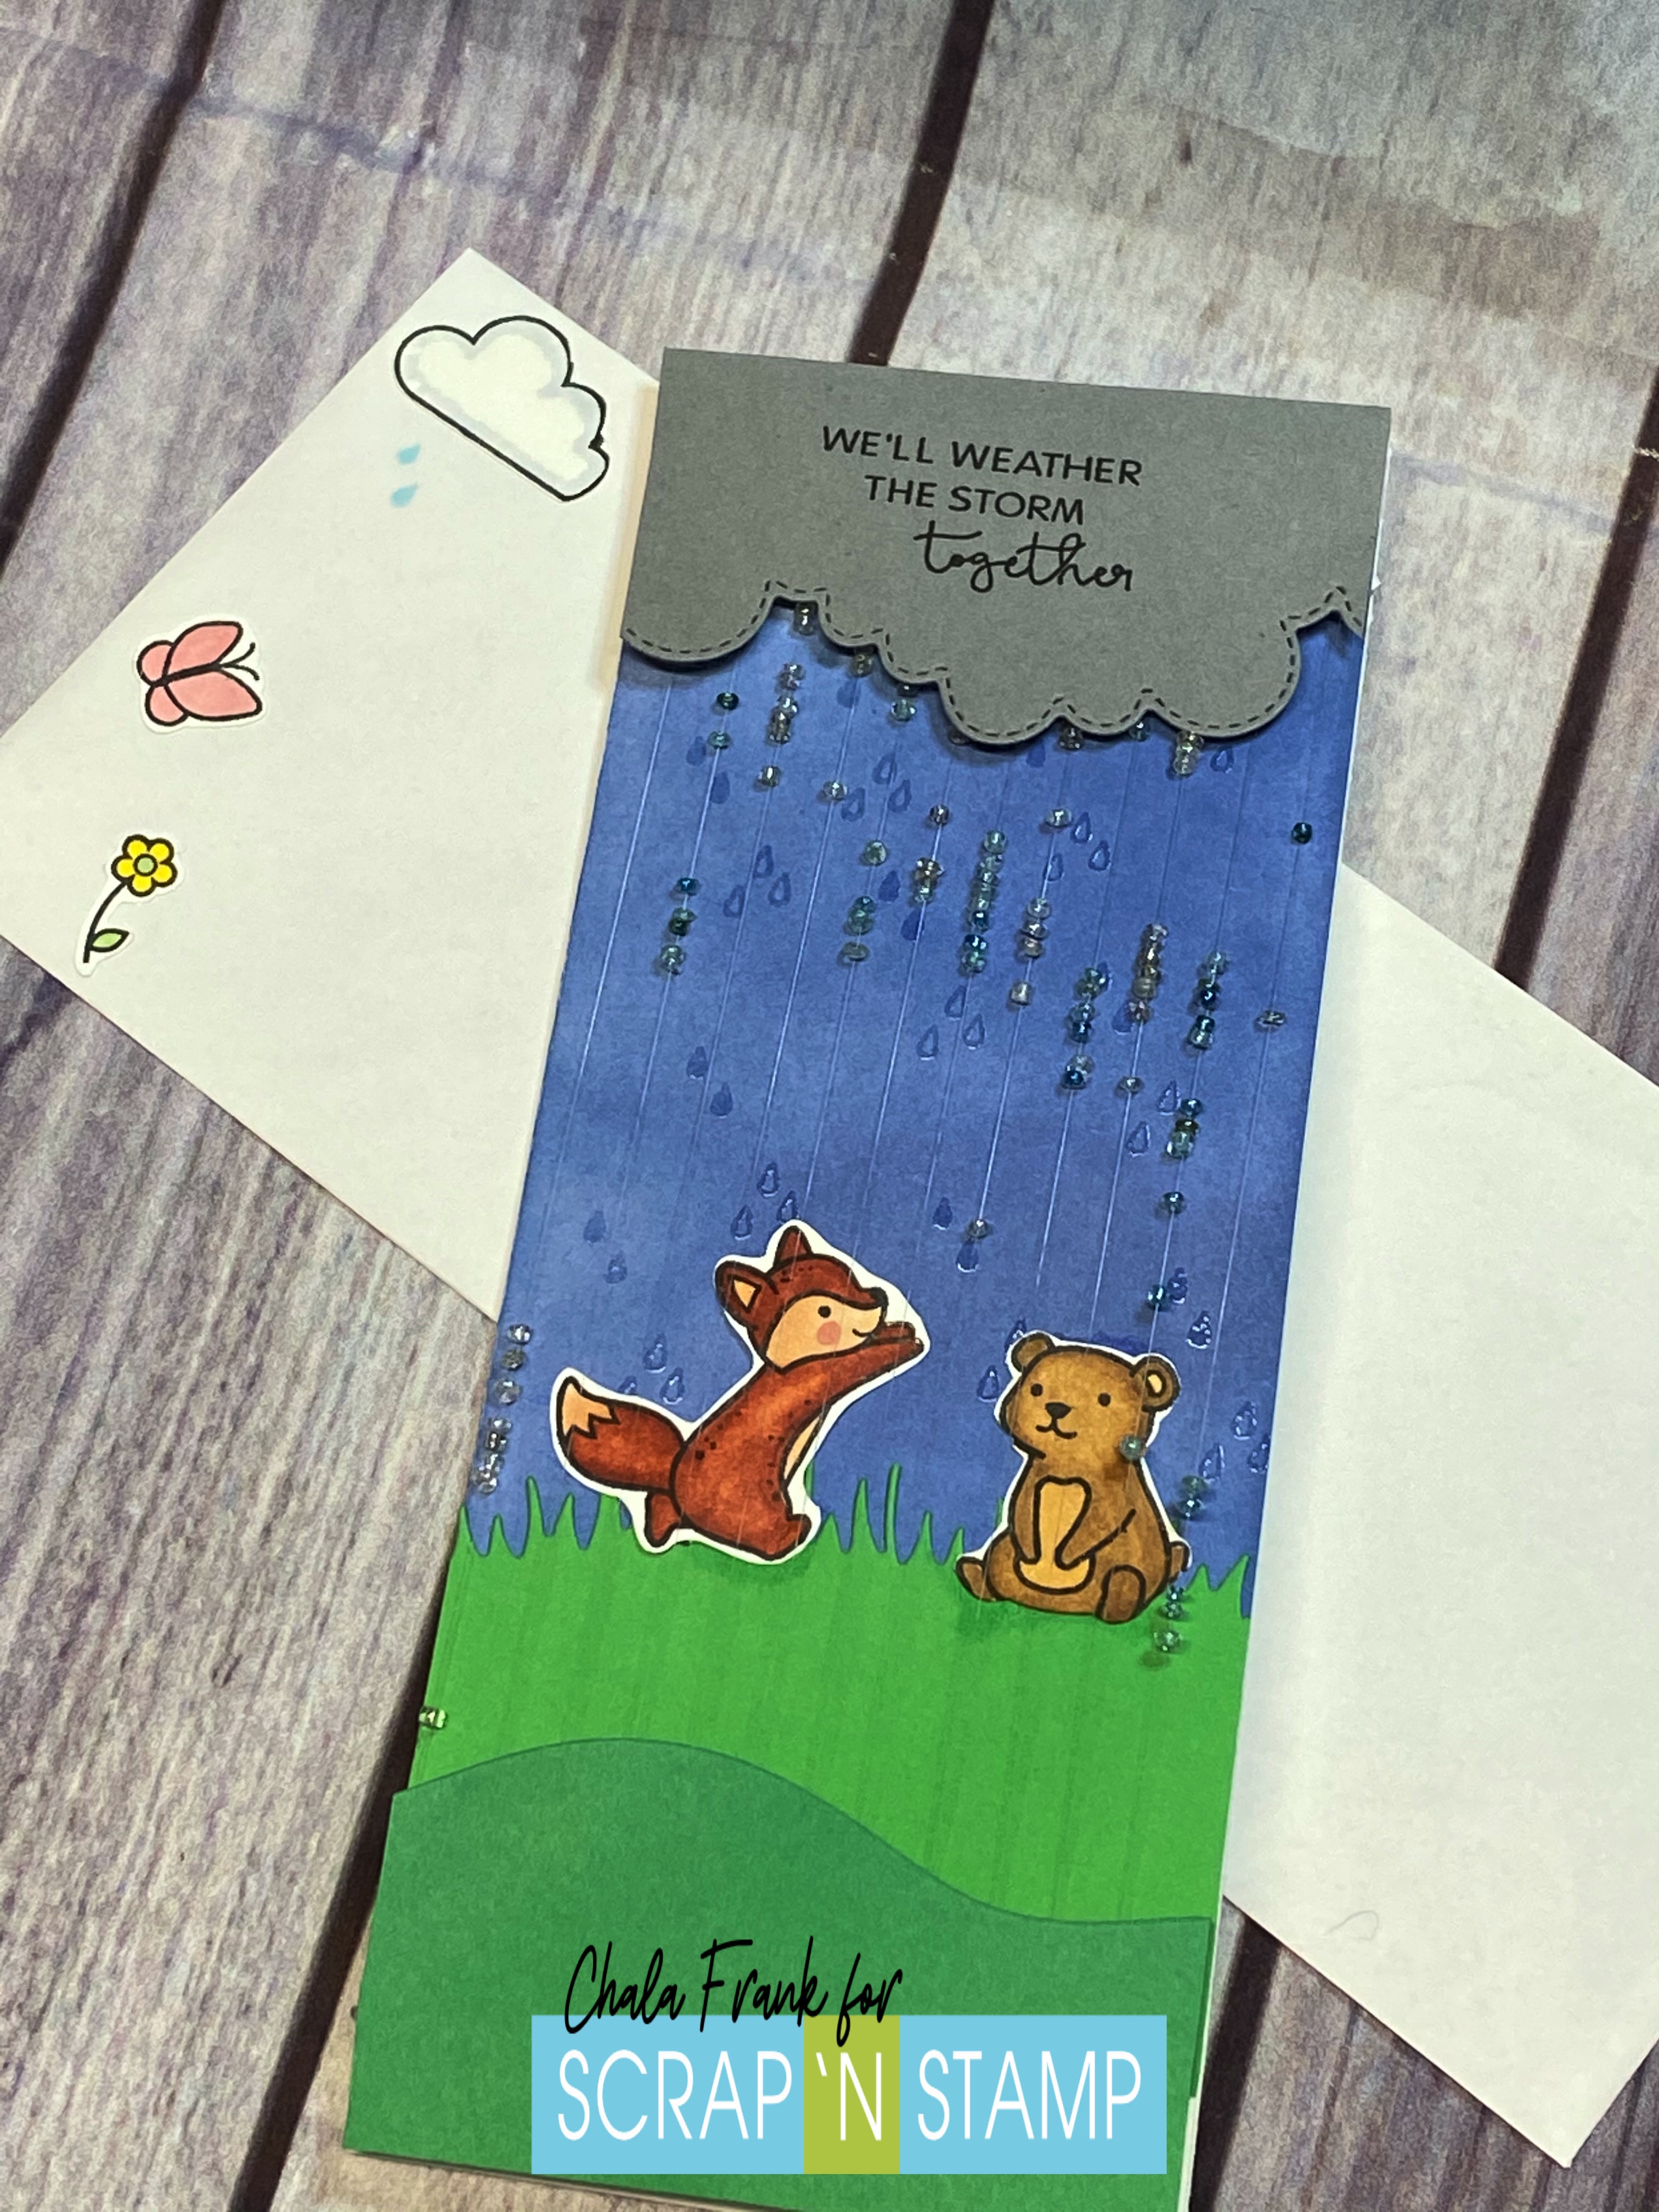
My fifth and last card I got even more crazy and decided to create an interactive card with the MFT Falling from the Clouds die set…but in my own way. I only used the notched die cut from the set as I have to extend the scene much taller and more narrow than the standard die frame allows.
I mask off the left side of my card base and ink blend the background with Faded Jeans Distress Oxide ink and my foam blending tool. I like to use the foam blending tool when I want to lay down a lot of ink and then I use my Picket Fence Blending Brushes when I want to blend two colours together (or for softer ink blending).
I pulled out a stitched cloud die from my stash and die cut a piece that would hide the upper notched element and I used the MFT Slimline Grassy Hills borders and Stitched Hillside Borders die cut from green cardstock to hide the lower element.
Before I start assembling and adhering things, I need to make sure I stamp my sentiment on the cloud panel. I used my stamp perfect and Versafine Clair Nocturne Ink. I also added some interest to the background by stamping a few raindrops with Versafine Watermark ink and clear heat embossed them. (You may also want to adhere any elements/characters at this point. I did it at the end but would recommend to do it at this point)
Our next step is to pull out some invisible thread and patience! Yikes are my eyes getting old! I also pulled out my long forgotten seed beads to thread on. It might be easier to watch the video to see how I adhered the thread and beads onto the notched pieces. It actually isn’t that hard. You just need to remember to inset them from the edges of your card a bit with some foam tape and ensure that you have the notches (or teeth) so that they face out. Also, keep your thread on the shorter side so as not to get it tangled when you are working!
After I strung the beads I added more foam tape onto of the notched element and adhered the covering elements (clouds and grass) over top. I then carefully added my little critters from the Lawn Fawn Butterfly Kisses stamp set underneath the thread (See above where I recommend to do it earlier!).
Again, I paired it with a matching envelope by creating some stickers with my Xyron sticker maker and some of the extra element pieces from the stamp set.


Whewf! That was a lot of cards – but it went by so quickly and easily! I could have kept going….and think once I get this post done I will go back to create some more as I still have some pre-coloured and cut elements left over!
I would like to know which one was your favourite! Vote here!
I want to thank you for hopping by! Remember to leave a comment on my blog and over at my YouTube video for your chance to WIN your very own Picket Fence Slimline Die Cutting System set!

To help celebrate the New Year, Scrap’N Stamp is also offering 21% off your order! All you have to do is enter this coupon code at checkout: “finally2021” Click HERE to start shopping!
I am looking forward to seeing your Slimsational Slimline creations! Share them over at the Scrap’N Stamp Facebook Challenge Page for even more chances to win!
Next up on the blog is SUSAN!
If you missed any of the previous Design Team posts you can click on the names below to check out their Slimsational Cards!
Happy New Year and Stamp Safe!


WOW! So many ideas!!!! I love them all!
LikeLiked by 1 person
They are all fabulous Chala but I do love the critters one.
LikeLiked by 1 person
Seriously?! Holy cow – you really outdid yourself, Chala! I couldn’t pick a favourite, because they all blew me away. What awesome cards to show off the versatility of this die set!
LikeLiked by 1 person
Wow! I LOVE all of your creations. Thanks for sharing the video too! I love using my Xyron too! Quick tip for threading your needle. They have big eye needles now, soooo much easier for threading. That’s what I use. LOL! It was really hard to pick a favourite, because I LOVED all of your cards.
LikeLiked by 1 person
Thanks Roberta! I usually use a bigger eye needle…but, I was using seed beads so I only had the one that would fit through them! Lol!
LikeLike
What a great set of cards.
LikeLiked by 1 person
WOW! Chala, these are all fantastic! Very hard to pick a fave but I may have to go with the last one with the rain because I don’t think I have the patience to do something like that.
LikeLiked by 1 person
Incredible! All the scenes are amazing!!! I love your video and how you created them! The Rain one is my favorite! I Love the critters and the beading rain 🙂
LikeLiked by 1 person
Wow.. look at you go! 5 fantastic cards Chala! You out did yourself for sure!
LikeLiked by 1 person
Being from Calgary I love the cowboys and cowgirls, but the critters in the rain is also one I would love to make.
LikeLiked by 1 person
That interactive rain or shine card has captured my heart and filled me with pure joy to admire, and also to aspire to re-create someday. Happy New Year, & thank you for running this contest!
-Megan // crystalcauldron
LikeLiked by 1 person
So many pretty cards – it was hard to pick a favourite! This is a great die set with lots of combinations!
LikeLiked by 1 person
Darling images and fabulous coloring and details! Love each one of your slimline cards! The rain scene with the beads looks awesome! Fabulous set of dies with so many possibilities!
LikeLiked by 1 person
Wow Chala…these cards are amazing and picking one as a favourite was difficult. So many cool creative ideas you used (love the beads, inside surprise, cow spots balloons etc).
LikeLiked by 1 person
WOW! Chala, I’m blown away by your creativity in showcasing this slimline die! Such a variety of cards, each one ever so delightful and special! LOVE x LOVE them all! Thank you for sharing your talents with us! Happy New Year!
~carol
LikeLiked by 1 person
Wow simply based on the number of cards you were inspired to make this die looks like it is a Must Have. You highlighted the versatility of it with all five of your amazing cards. Thanks for some wonderful ideas.
LikeLiked by 1 person
All of your cards are awesome! I think I like the interactive rain card the best but only because I am a big kid love a card that I can play with! Lol!
LikeLiked by 1 person
You made such fun cards but I have to say, the Fairy one is most definitely my favorite. I am going to try a slim line today and you have inspired me.
LikeLiked by 1 person
this is really cool!!!!! (the envelope) the cards were all very beautiful i picked the cactus one because he looked like he was coming inside and the cowboys were greeting him!!! kida like swinging bar doors from the olden days!!! like gunsmoke
LikeLiked by 1 person
As I’ve followed this hop I have marveled at how different each artists card is then you gave us 5 very different cards using the same slim line die cutting system! I love these and am amazed at all the possibilities. I would never had thought to use seed beads this way and I will have to try them!
LikeLiked by 1 person
WOW!!! What an awesome surprise to see so many amazing card ideas! Thank you for so much inspiration!
LikeLiked by 1 person
What beautiful cards! Wow!
LikeLiked by 1 person
Holy Moly Wowsers!! You are the slimsationals queen of all and then some. Having never done a slimline, these are astounding and super super cute! Really cannot pick a favorite, love em all! Really wanting to get this slimline system more and more.
LikeLike
Very creative…
LikeLiked by 1 person
Those cards are all great, and my two personal favourites are the vertical ones. You’re very creative! Thank you for the opportunity of the giveaway.
LikeLiked by 1 person
You’ve been busy! Every single card is just perfect, but those beads? What patience! TFS!
LikeLiked by 1 person
It was hard to pick one favorite but the together again speaks to me I miss my friends. Great cards! Happy New Year!!
LikeLiked by 1 person
So many cards! 🙂 Love the slimline cards of all orientations – really sintering to see the single aperture too. Thanks so much for sharing all this inspiration.
LikeLiked by 1 person