Today we are hopping along with Scrap’N Stamp for their Bling and Blossoms May Blog Hop. Join us for your chance to win a $50 Gift Certificate and pamper yourself with some Mother’s Day shopping at 20% off! Just use coupon code: Pamper You can check out the newly arrived items by clicking HERE
May is such a hopeful month! With all the beautiful flowers beginning to bud and some even blooming, it fills my heart with such joy to see all the beauty that spring brings! That’s why I was so excited for this Blog hop! Blooms and bling – my two favourite things! I was also excited to use Gina K’s new stamp set The Best Flowers. I adore this stamp set for so many reasons…not just because they are of my favourite flower, but the images are so versatile and sentiments are perfect as well!
I know your time is precious – so here is the link to my video for you to check out how I made today’s cards. Remember to like and leave a comment for your chance to win the gift certificate!
I hope you enjoyed the video and it has left you inspired to try this card for yourself!
I am celebrating by hopping along with the July Scrap’N Stamp Blog Hop! This month we have 3 amazing Canadian themed prized packs PLUS I am personally giving a prize away that is worth $74.00. Want to know what it is and how you can win? You will have to head to my YouTube channel to find a secret Canada themed card and the details on how you can win!
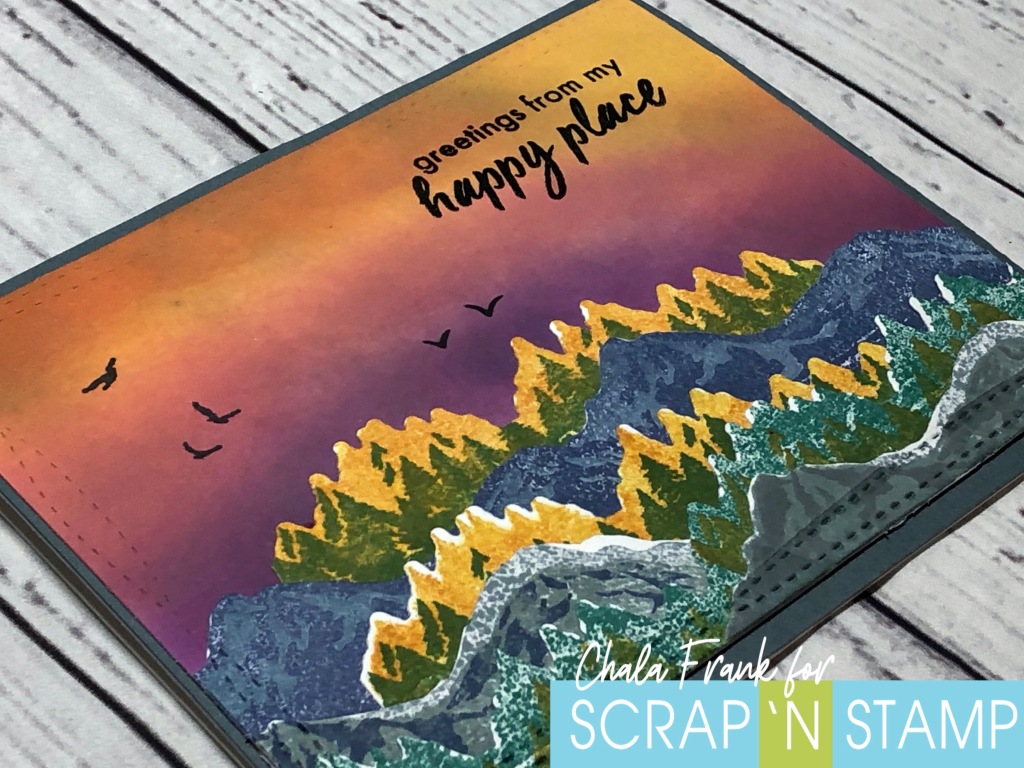
Today I am so excited to share an amazing stamp and die bundle from Hero Arts called the Layering Mountains at the Lake Bundle. This stamp set is stunning! It was originally release last year at this time and it sold out quickly! I am happy to say that Hero Arts has re-released it in 2020 and it is the perfect stamp set for me to use for my Canada Day card! I live in Calgary, so I am just a hop, skip and jump away from the beautiful Rocky Mountains. In particular, I love the Mountain sunsets. That was the inspiration today’s scene card.
To create the colourful sunset, I am using Distress Oxide inks in the colours Squeezed Lemonade, Spiced Marmalade, Worn Lipstick, Seedless Preserves and Wilted Violet. I blend these inks with both my regular blending tool and the Picket Fence blending brushes. Both these tools helped me to get the perfect colour intensity and blending of the inks. I am also using my Wendi Vecchi Make Art Stay-tion to hold my cardstock in place.
I will then move onto the stamping. I am absolutely in love with the detail of these layering stamps! For these images I am using regular Distress Inks in the colours, Wild Honey, Squeezed Lemonade, Fossilized Amber, Pine Needles, Peeled Paint, Chipped Sapphire, Blueprint Sketch, Weathered Wood, Iced Spruce and Hickory Smoke. I also pulled out my Unicorn White from Hero Arts.
You will want to have some sort of stamp platform in case you need to double stamp a layer. I am using the Hampton Arts Stamp Perfect today. Both the mountains and the trees have two layers. A base layer and a more detailed layer. I found that you can switch with having a darker background and lighter detail layer, but having the lighter background and darker detailed layer was visually more pleasing and had more detail (for me). I continued the same stamping process for the trees. (Watch my YouTube video to find out what cool stamping trick I found out you could do with these stamps)
This stamp and die bundle comes with 4 dies. I noted that two of the dies lines up perfectly, one for the mountain and one for the trees. The other mountain and tree die seemed to be almost a “bonus”. I couldn’t get them to line up with the stamps but can see that you could use them to die cut coloured cardstock and then can add shadowing with either ink blending or copic markers. However, for today’s card, I stuck with the coordinating dies.
I like to build my scene and then take a picture before adhering everything down. This way I can remember where things go…or visually compare if I decide to tweak something. I will then adhere the images with Gina K Connect glue. Using a liquid adhesive gives me time to wiggle images into the perfect place before they are set.
I like the idea of the scene being framed so I decided to run the panel through my Gemini Jr. and die cut a boarder from the MFT Wonky Stitched border die. I was so surprised that despite all the layers I had the Gemini Jr. was able to cut through all of them! I must have made the perfect sandwich! Lol!
To help the sunset pop even more I adhered the scene onto some smoke grey cardstock and stamped my sentiment with Versafine Claire Nocturne Black ink and heat embossed with clear embossing powder. Finally, I wanted to add the birds but was afraid of stamping them in an area I didn’t like. I pulled out a scrap piece of acetate (probably from some old packaging of items I purchased from Scrap’N Stamp” and layer that over my card. I don’t want to ruin it now!!! This now lets me stamp the images to see what it will look like before committing! Once I have the birds in the perfect place and stamped all that is left to do is adhere the panel onto an A2 sized card base and we are done!
My next cards to warn you are silly and one may even be thought as “inappropriate”. I thought of so many funny Canada cards I couldn’t get them all done!
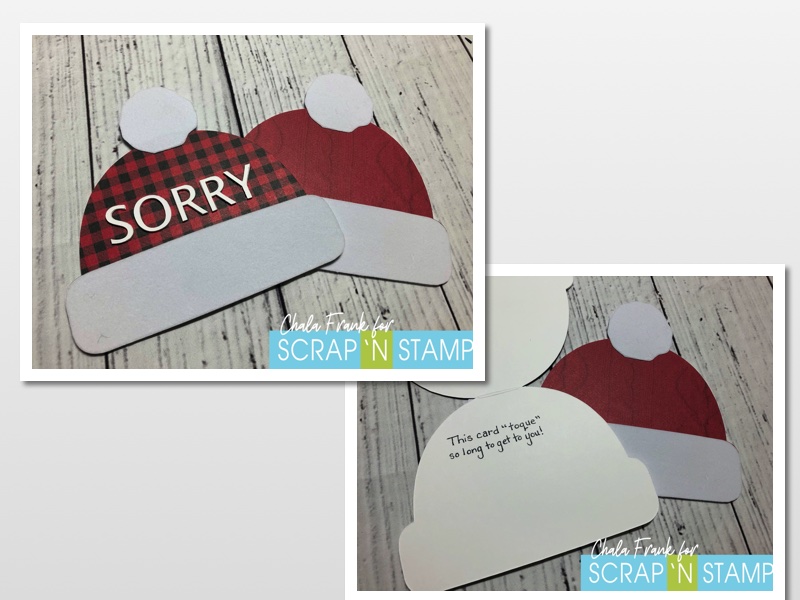
I strayed from the typical A2 card and decided to create a shaped card. Using my Silhouette machine (although you can easily create this without the machine) I found a fun winter hat (known as a “toque” in Canada) and was able to easily create a shaped card. I wanted to step up the card even more and give it some fun texture by using White Thermoweb Flocking for the fur and pom-pom. When cutting flocking transfer sheets with your Silhouette or Cricut, you will want to make sure you lay a piece of scrap paper onto the adhesive carrier sheet and lay your flocking down onto that fuzzy side down (secure edges with low tack adhesive). Otherwise, your fuzzy flocking will stick to the transfer sheet and ruin your flocking and the sheet! If you try to cut it fuzzy side up….the blade will scrape the flocking off. You can also just fussy cut out with scissors too!
I adhered patterned paper (good ‘ol Canadian Lumberjack pattern or paper that looks knit is fun!) and the flocking onto the shaped card base I created with an adhesive tape runner. For one of the cards I die cut out the word “Sorry” several times from white cardstock and stacked them together to adhere onto the front of the card and on the inside I wrote: ” it toque me to long to get this card to you” (GROAN! I know!) The other card I just left blank and will likely make it into a Christmas card.
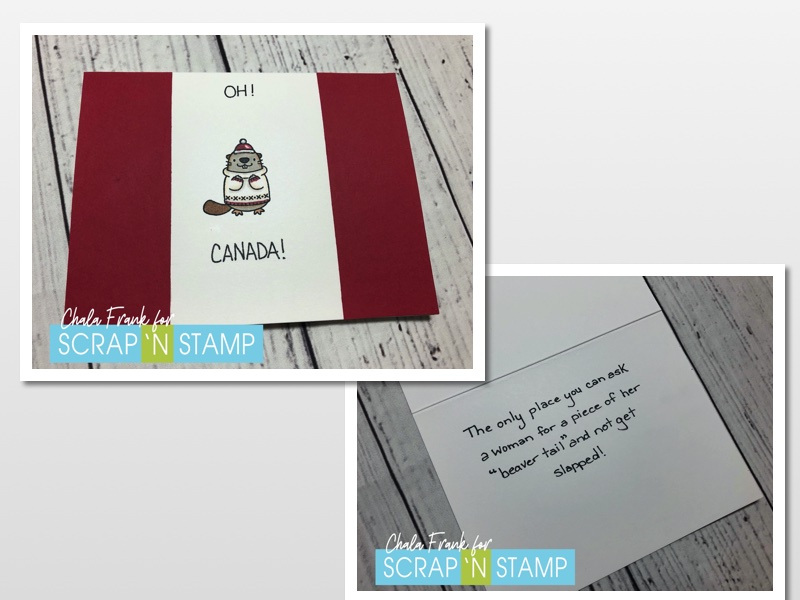
For my last card (or is it? Go to my YouTube channel to find out!) I am using one of my favourite stamps sets from My Favorite Things (anyone else struggle to spell it like that?) BB Sweater Weather in the Woods. These adorable woodland creatures are perfect for a Canadian themed card! I couldn’t resist using the beaver and thought it would be cute to use our National animal in place of the maple leaf for this flag inspired card. I used some masking techniques by using Gina K’s Masking Magic Sheets to stamp the images so the beaver looked like he was wearing the toque. The trick to masking is making sure you stamp the image that you want to appear “on top” or “in front” first and then place the mask over that image and stamp the next. I hope that makes sense! My ink of choice for this project is the Memento Tuxedo Black ink as I will be using Copic markers to colour this cutie in! For the sides of the flag I just cut strips of red cardstock and adhered them with some Gina K Connect liquid adhesive and hand lettered “OH! CANADA!” with a black Copic liner.
NOW! The funny/inappropriate (?) part of the card is the inside….
To clarify for those of you who don’t know…. a Beaver Tail is a doughnut like pastry dessert shaped like a beaver’s tail. So…really the only dirty part is if you get the kind with glaze or melted chocolate on top! lol!
All right you Hosers! That’s it for me today and for this blog hop! I hope you enjoyed today’s Canadian inspired cards! Remember there are several ways you can win the prize packs (including my super secret one!): COMMENT on all the blog participants blogs. You can get there by clicking the links below. LIKE and SUBSCRIBE on Facebook, YouTube, Twitter and Instagram! SHARE! – because it is the Canadian thing to do to share things you like with others! We love having new people find out how incredibly cool and kind we are! I am off to get a Tim’s and may even see Mike from Canmore there!
Oh…and here’s a hint to win my secret prize….”May 2, 1670″……remember you can find out more details on how to enter to win in today’s YouTube video here…..
Did you know Scrap’N Stamp has a Facebook Challenge Page? You might even when a prize if you participate in our monthly challenge and share your inspired creations!
Need to start the blog hop from the beginning? Here are the links!