
Welcome Back!
Today’s cards are are part of Scrap’N Stamp’s March Blog Hop – Backround Check.
You can start at the beginning by clicking HERE!
Remember to leave comments on ALL the blog posts for your chance to win one of 8 prize packs or a $50 Scrap’N Stamp Gift Certificate!
Also the Picket Fence Brushes are on sale for 20% off starting Friday, April 5, 2019 and ending Sunday, April 6, 2019 just use the coupon code BRUSH20.
Let me start by saying I LOVE how these cards turned out!
I am FINALLY trying out the “Life Changing Ink Blending Brushes” from Picket Fence Studios and I am going to give you an honest review.
I suffer from arthritis in my hands and they often fatigue quickly with the regular blending tools and because of this I tend not to due ink blended backgrounds as often as I would like. So, these brushes are giving me hope!
The very first thing I notice was how light they were and how incredibly soft the bristles were. I started out by using Distress Ink in Wilted Violet doing a comparison between the new ink blending brushes and the regular ink blending tools from Rangeron to some Recollections brand white cardstock.
The blending on the left is with the Ranger blending tool and the one on the right is with the new ink blending brushes.
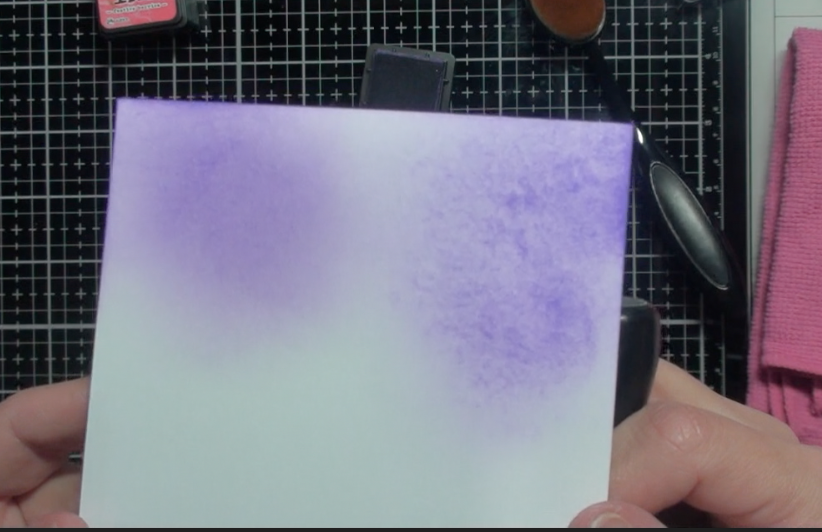
I have to say this initial test was very disappointing…..I turned the paper over to see if that helped….NOPE! It was still splotchy! ☹️
I decided that I needed to try again but this time with a higher quality cardstock. I used Neenah Solar White cardstock and tried the brushes again.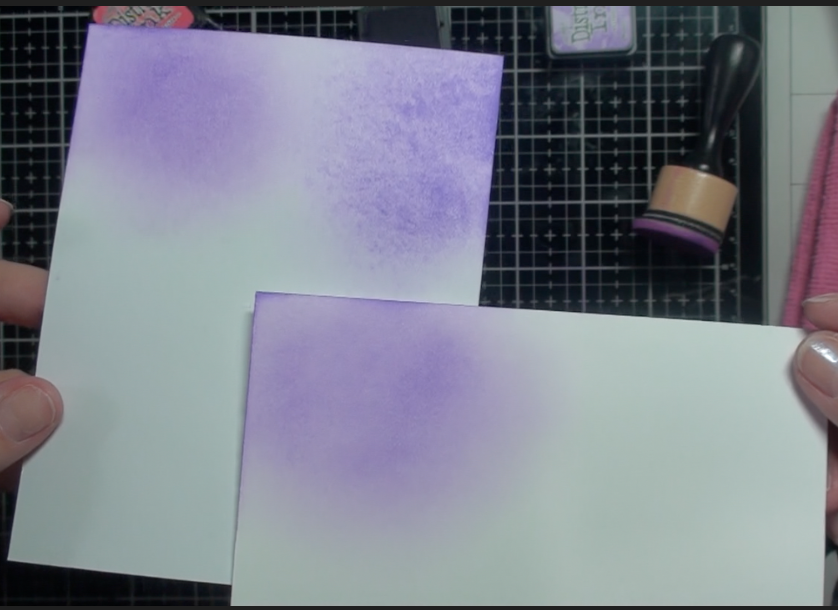
The result is WAY better!!! You can see the great results I got on the bottom piece compared to the the first one I did. This made me VERY HAPPY!!!! 😍
I was so excited by the results and how easy it was to blend without fatiguing my hands! The only suggestion I would have for the company is with respect to the handles. I felt like they were flimsy and I was always afraid that I might break them off! I was very mindful of this and often would hold the brush by the “head”.
Now that I figured out the problem…I made sure that I used the Neenah Solar White cardstock for all my ink blending. I will be embracing the Bokeh technique today.
I continued to blend with the Wilted Violet and also used Festive Berries Distress Inks. I was amazed at how by simply wiping the brush onto a microfibre cloth how clean they got! I even tested the brush on clean white paper to see if there was any residual ink left behind – there was none!! It was impressive!! I created two backgrounds with these colours and also created one using Salty Ocean and Mowed Lawn. The results of the blending are stunning!
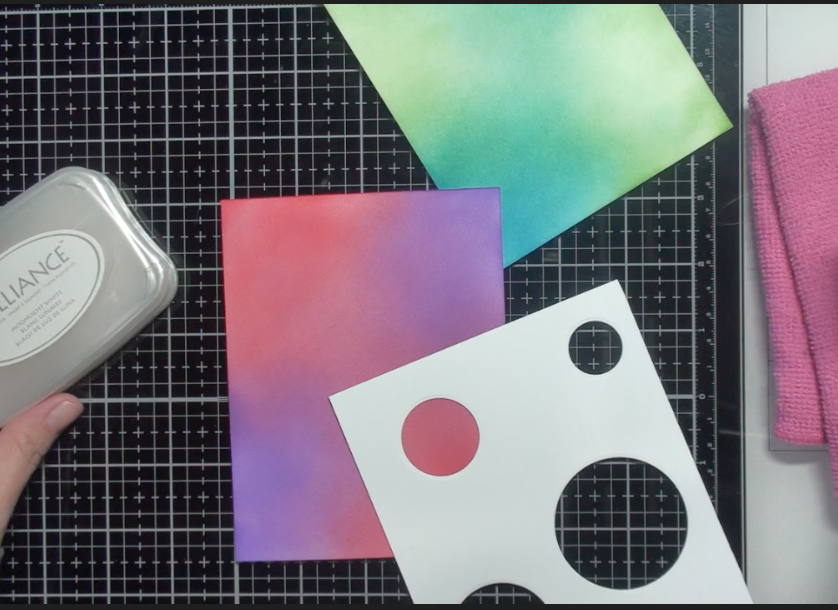
I then created a stencil out of cardstock and some circle dies to create the Bokeh effect. Make sure that your background panel is completely dry before adding the pigment ink!!! I will be using Brilliance Moonlight White Pigment Ink and blending it with the brushes, layering larger and smaller blended circles.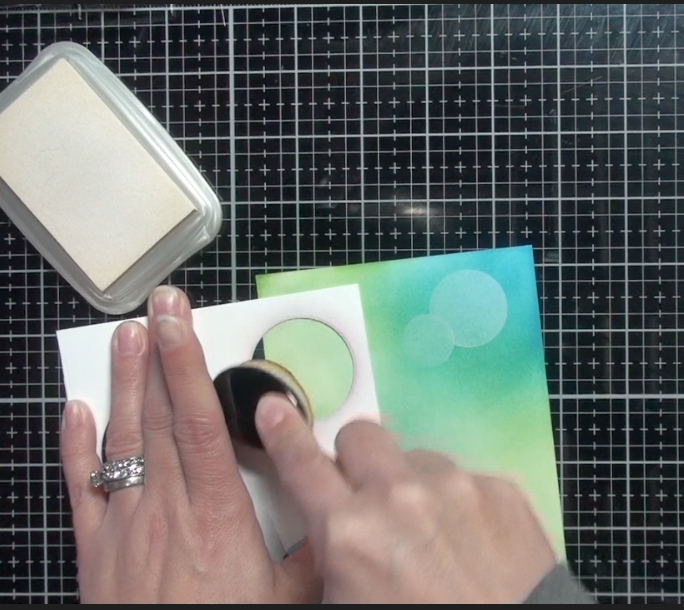
I am a big fan of this brand of ink as it has a beautiful shimmer to it! I also used the Memory Box Pop Dots Stencil to create my third background with circles that do not overlap.


I like the look of both techniques!
Now here is where I made a bit of a boo-boo…. I should have done my sentiment stamping first…..but the next step I did was to treat the panel with some Ranger Distress Glaze. I used by finger to apply a thin layer of the glaze overtop of the inked background and then buffed it with a clean cloth. This helps to seal the inks (both pigment and distrees ink) so that they do not rub off…..However, if you plan on stamping a sentiment the glaze will cause the other ink applies on top to bead up…and smudge. I will show you this in a bit.
Using the Memory Box Stencil background I stamped my sentiment from the Concord & 9th – Say Hello stamp set with VersaMark onto black card stock and heat embossed with white deatil embossing powder. I trimmed the inked panel down, adhered it to an A2 sized black piece of cardstock and then adhered that onto an A2 side folding card. At this point you can add sequins, pearls or other embellishments…However, I wanted the background to be the focus and thought adding further embelishments would detract from that. I also created a coordinating envelope for this one, making sure that I addressed the envelope before adding the Distress Glaze. Hoping my bestie since first grade liked her card!


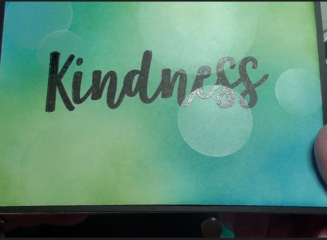
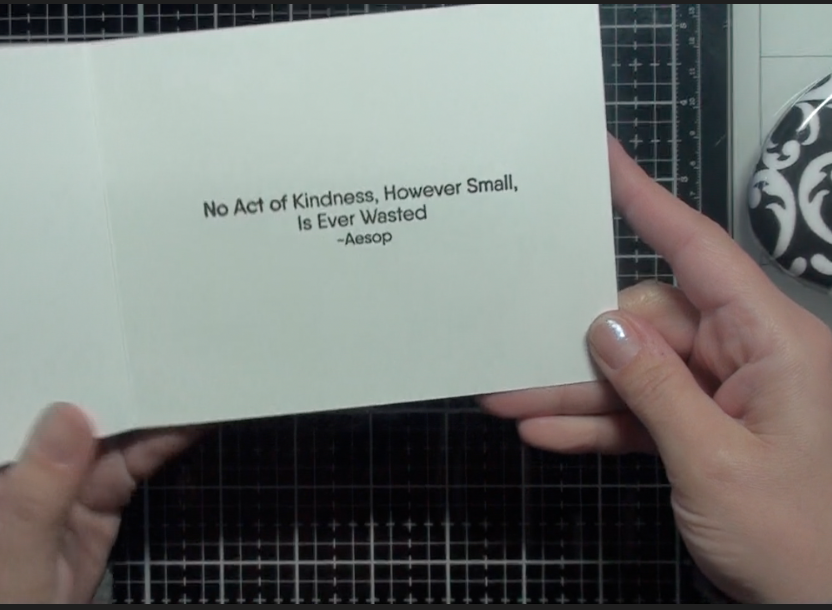
For the blue and green card I used the My Favourite Things Kind Words Sentiment set, stamping Kindness on the outside and a second sentiment on the inside.. You can see in the picture below that even after trying to dry the ink with my heat tool it smudged a bit. 🥺 I still like how it turned out though!!

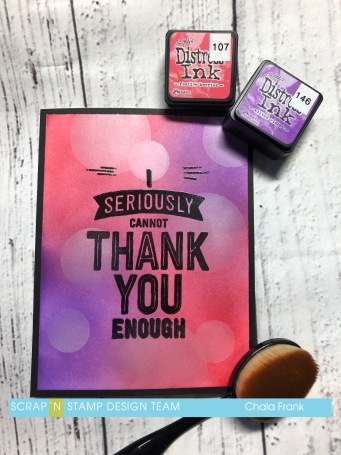
For the third background I decided it was best to stamp my sentiment from Concord & 9th – Seriously Thank you using Versafine Black ink and embossed ith with clear embossing powder. The shine of the sentiment makes me smile!
I had so much fun making these cards and this was made better by the awesome new blending brushes. I would recommend you adding them to your “necessary tools” list for your craft room. I can’t believe how smooth the blending went (using the higher quality carstock) and how easy it was to clean the brushes in between colour changes!
Here is a look at all three cards together.

I encourage you to watch my YouTube video to see the blending and how these cards came together, including some envelope art.
Here are the links to all the designers participating in today’s blog hop. Remember to leave comments for your chance to win!!
Thanks for stopping by and Happy Crafting!
~Chala
You can also keep up with all my creations and get sneak peeks to upcoming post at the following links:

Beautiful cards, LOVE the color choices 🙂
LikeLiked by 1 person
Great cards Chala – love that technique. And thanks for the tip about glazing after you do the sentiment – good point.
LikeLiked by 1 person
Love the colours you used, Chala! Great cards!
LikeLiked by 1 person
Great cards – I love the bokeh technique.
LikeLiked by 1 person
Beautiful cards. Love your backgrounds. You gave great tips for blending and protecting our projects.
LikeLiked by 1 person
Beautiful cards! Love the color combos.
LikeLiked by 1 person
Stunning bokeh backgrounds. I must try it!!!
LikeLiked by 1 person
Love the bokeh effect backgrounds you created! Great color combos! The blending brushes look awesome… gotta try them!
LikeLiked by 1 person
I love that you made your own stencil, specific to your intended technique. Thanks for the reminder to think outside the products on hand!
LikeLiked by 1 person
I have not made a bokeh card since I got Distress Oxide Ink Pads, so thanks for that idea to revisit an old technique with newer supplies. Your cards are gorgeous.
LikeLiked by 1 person
Beautiful cards! I love your color choices. Great tip about the cardstock. I mostly have the recollections but I do have a few pieces of the Neenah so I can try that!
LikeLiked by 1 person
These backgrounds are so pretty! 🙂
LikeLiked by 1 person
Love your colour choices for the bokeh blending and thanks for sharing a video!
LikeLiked by 1 person
I love the colors you chose! What a brilliant idea to create a matching blended envelope.
LikeLiked by 1 person
I am glad you posted how the brushes worked on both kinds of cardstock…I have found that in the past. Wonderful and pretty cards…gorgeous results.
LikeLiked by 1 person